Scenario Type: Bomb Run
Size: 12 Vs 12
Time Limit: 15 minutes
Victory Conditions: 500 points
Scoring: 75 points per successful bomb detonation,2 points per player kill.

Overview
Much of the Empire’s commerce flows along its rivers. In a land where travel by wagon is often fraught with danger and the roads are not always well-kept, the Empire’s many waterways make for swifter, safer passage.
Among the Empire’s rivers, the Talabec is certainly one of the most important. As the invading warhost presses deeper in the Empire, the strategic importance of the Talabec grows. Knowing this, the forces of Chaos have set out to disrupt the shipping of supplies and troops that flows to and from the front lines along the river’s course.
Near the village of Esselfurt, the Talabec forks into two branches before rejoining a short distance away. The villagers have built a dam across one of the forks, and the forces of Chaos intend to destroy this dam and flood the area. Using foul magic, they have erected a temple with a magical altar. Those who touch the altar are blessed with the power to blast apart whatever they touch. A garrison of soldiers at the nearby village must stop the invaders from wrecking the dam, and they’ll need all the help they can get.
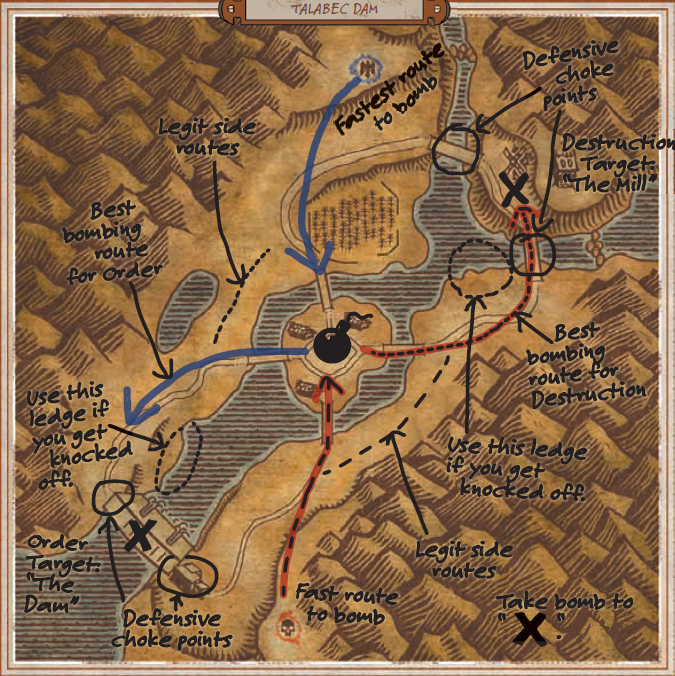
This bomb run scenario features a single bomb that both realms have to deliver to their intended bomb targets. In this case, Order is trying to blow up a large Chaos sigil that is infecting Talabec Dam, and Destruction is trying to blow up a windmill that is a major production engine for a local town off of Talabec River.
Order Strategy
When you start this scenario, you’re near your respective opponent’s target (Destruction spawns near the Dam and Order spawns near the Windmill). You can hop down in a few spots to either assault. As you approach the central location where the bomb is, you’ll notice four (two from each side). You can either stay and defend this location for bomb respawns, and run. When the bomb is picked up, you have 60 seconds to get to your target anyone around you gets knocked back. Bombs are deadly, but you also amass successful bomb runs. Let one player grab the bomb and another run escort. Don’t send everyone; the the Bridge. Why? If the bomb runner is killed and the bomb not picked up by bomb will respawn in the center of the Bridge. Someone else can then grab it and On defense, watch and see how many enemies go with the bomb runner. If they after them and destroy them before they can reach their target. If the majority control of the Bridge and grab the bomb next time it spawns.
Each of the bomb locations can be defended fairly well because you can only approach however both locations are highly susceptible to knockback. You won’t die if you into the river below, but any extra firepower that comes your way may make life difficult.
Destruction Strategy
When you start this scenario you’re near your respective opponent’s target
(Destruction spawns near the Dam and Order spawns near the Windmill). You hop down in a few spots to either defend or go on the assault. As you approach the central location where the bomb is, you’ll notice four ways into this location (two from each side). You can either stay and defend this location for bomb respawns, or take the bomb and run. When the bomb is picked up, you have 60 seconds to get to your target or you blow up and anyone around you gets knocked back. Bombs are deadly, but you also amass a hefty point gain for successful bomb runs.
Let one player grab the bomb and another run escort. Don’t send everyone; the rest stay behind and control the Bridge. Why? If the bomb runner is killed and his escort in five seconds, the bomb will respawn in the center of the Bridge. Someone and take off toward the Dam. On defense, watch and see how many enemies just send a few, dispatch a group after them and destroy them before they can reach goes on the run, stay and gain control of the Bridge and grab the bomb next time.
Each of the bomb locations can be defended fairly well because you can only approach sides; however both locations are highly susceptible to knockback. You won’t die back into the river below, but any extra firepower that comes your way may make life difficult.
