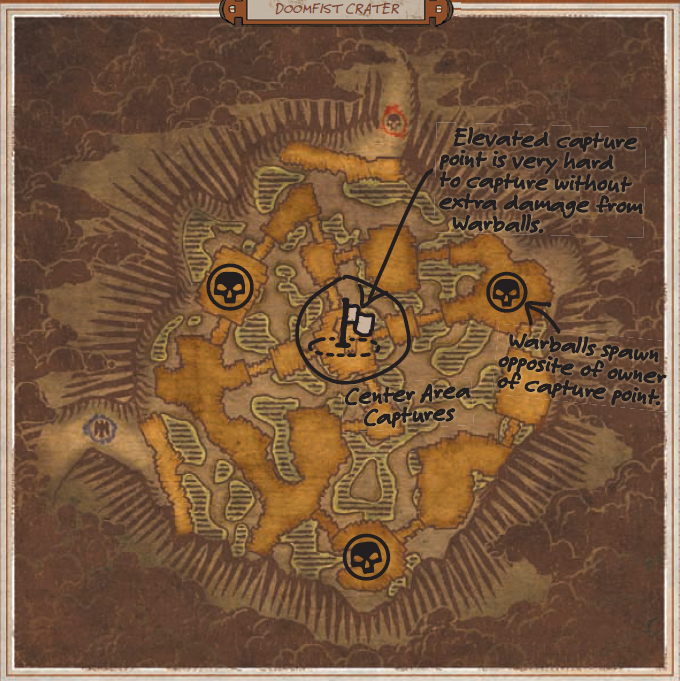
Scenario Type: War Ball
Size: 12 Vs 12
Time Limit: 15 minutes
Victory Conditions: 500 points
Scoring: 3 points every 5 seconds for holding capture area, 2 points per player kill, 1 point per player kill if you hold a War Ball, 1 point if you kill the player carrying the War Ball.

Overview
Doomfist Crater dominates the horizon in the southwest area of the Badlands; it is the ancient site of a pitched battle in which a powerful Chaos champion was slain. The resulting explosion as his body released all the stored up Chaos energy was large enough to level mountains. Deep within the crater, now filled with green, toxic waters, the champion’s remains have rested for thousands of years, his bones infused with tiny bits of warpstone. Over the top of the crater’s epicenter, goblins have constructed floating platforms, connected to the crater’s edge by rickety bridges. From these platforms, the goblins are dredging up bits of warpstone for nefarious purposes. The scenario mixes King of the Hill rules with War Ball. There is one central capture area, and if you can hold it, your team gains the most points over time. However, if your team controls the capture area, War Balls spawn for the other team around the cavern. These War Balls grant the bearer 25 percent more damage. Unfortunately, each player killed with a War Ball results in a 25 percent chance of the bearer dying as well. After one minute, no matter what, the player carrying the War Ball dies.
Order Strategy
Proceed to the center of the cavern as an organized unit. The only way to hold the central capture area is with coordinated tactics or raw superior numbers. The capture area is wide open, so attacks can come from any direction. If you’re holding it, face outward, ready for anything, and work in small groups to repel invaders. Healers should stay in the middle and load available targets, specifically ones being targeted, with heal-over-time spells. If you’re assaulting the capture area, grab the War Balls whenever they pop up; they may kill you quickly, but the extra damage is what you need to punch through the enemy’s defenses and rout them. Finally, learn the map well. You don’t want to waste time running around, and memorize that your spawn point is directly west of the capture point so that you can reach it in seconds should you resurrect.
Destruction Strategy
Proceed to the center of the cavern as an organized unit. The only way to hold the central capture area is with coordinated tactics or raw superior numbers. The capture area is wide open, so attacks can come from any direction. If you’re holding it, face outward, ready for anything, and work in small groups to repel invaders. Healers should stay in the middle and load available targets, specifically ones being targeted, with heal-over-time spells. If you’re assaulting the capture area, grab the War Balls whenever they pop up; they may kill you quickly, but the extra damage is what you need to punch through the enemy’s defenses and rout them. Finally, learn the map well. You don’t want to waste time running around, and memorize that your spawn point is directly north of the capture point so that you can reach it in seconds should you resurrect.
