Scenario Type: Capture the Flag
Size: 12 Vs 12
Time Limit: 15 minutes
Victory Conditions: 500 points
Scoring: Holding the Gate Switch: 50 points per capture and 2 points every 5 seconds, Ammunition Cache: 50 points per capture and 1 point every 5 seconds, Supply Room: 50 points per capture and 1 points every 5 seconds, Enemy Kills: 1 point per kill plus modifiers (+5 points) if you control the Gate Switch, +1 point for Ammunition Cache, +1 point for Supply Room).
Overview
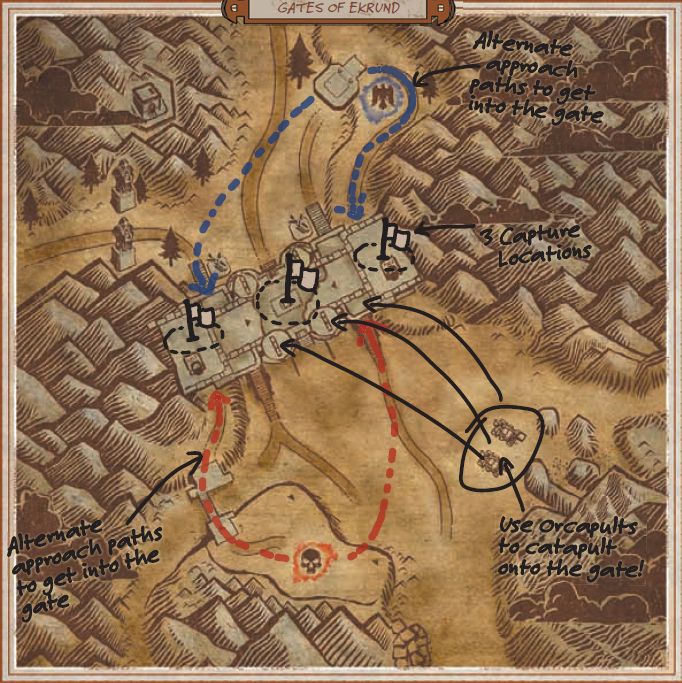
Ekrund has been overrun by greenskins. The Dwarfs have returned to Ekrund to take back their ancestral lands, but they must first secure the Gates to prevent more greenskins from flowing into the area. These ancient Gates guard the only mountain pass that is wide enough to accommodate an army. For the Dwarfs, recapturing these gates and sealing them shut is paramount to defeating the greenskin presence in Mount Bloodhorn. The Dwarfs have succeeded in repairing most of the damage to the Gates, but the greenskins remain relentless in their attempts to break through, if only to annoy the Dwarfs. The greenskins have no siege weaponry capable of damaging the doors, so they are forced to try to take control of the gate mechanism, located atop the gates. To accomplish this, the greenskins have erected siege towers that they use to climb to the top of the walls.
Intended Mechanics
- Capture and control Battle Objectives to gain victory points
- Capture enemy Battle Objectives to stop enemy progress.
- Keep control of Battle Objectives to increase Kill points
Order & Destruction Strategy
There are three capture points, but your main priority is the central one: the Gate Switch (Middle). Move as a group to the closest Battle Objective Capture and move to the middle one. Keep your healers and ranged on the top level and battle with melee on the middle battle objective. Win and push to capture the next Battle Objective. It is a pretty simple Scenario with brute force. You either have the damage to push or not. The scenario is small so you don’t have the space to move and back cap.
Best Winning Strategy
This Scenario does not offer a “best way to win”. You have however two options to explore in the initial first fight.
- Go to the first Battle Objective as full force (all groups) and push through win or lose.
- Split up, some do the above and the rest move to the closest enemy Battle Objective and try to flank the healers and ranged. Very hard to make this work with random players.

