Scenario Type: King of the Hill
Size: 12 Vs 12
Time Limit: 15 minutes
Victory Conditions: 500 points
Scoring: Lighthouse: 15 points for a capture then 2 points every 7 seconds, Barracks: 15 points for a capture then 2 points every 7 seconds, Fortress: 20 points for a capture then 3 points every 7 seconds. Player Kills 5 points per player.
Overview
This imposing edifice, recently constructed on an island of rock just off the shore of Nordland, is the cornerstone of the province’s coastal defenses. Numerous batteries of cannons bristle from the storm-lashed walls of Nordenwatch, safeguarding the nearby town of New Emskrank from assault by the black ships of the Northmen.
Knowing that the fort will pose a threat to his fleets, Tchar’zanek, lord of the Chaos Warhost, decides to first attack by land, drawing out the soldiers stationed in the sea fort. His plan proves successful, and when the garrison at Nordenwatch sails ashore to defend New Emskrank from assault by the ravaging warhost, the dread warlord gives the signal for his fleets to assault the fort and seize control of its guns.
Now, the remaining soldiers in the fort fight desperately to fend off the attack from the black warships of the enemy. Knowing that they must hold at all costs, they dispatch a messenger to the shore calling for reinforcement.
Intended Mechanics
- Capture and control Battle Objectives to gain victory points .
- Capture enemy Battle Objectives to stop enemy progress.
- Keep moving, fighting, capturing until victory.
Order & Destruction Strategy
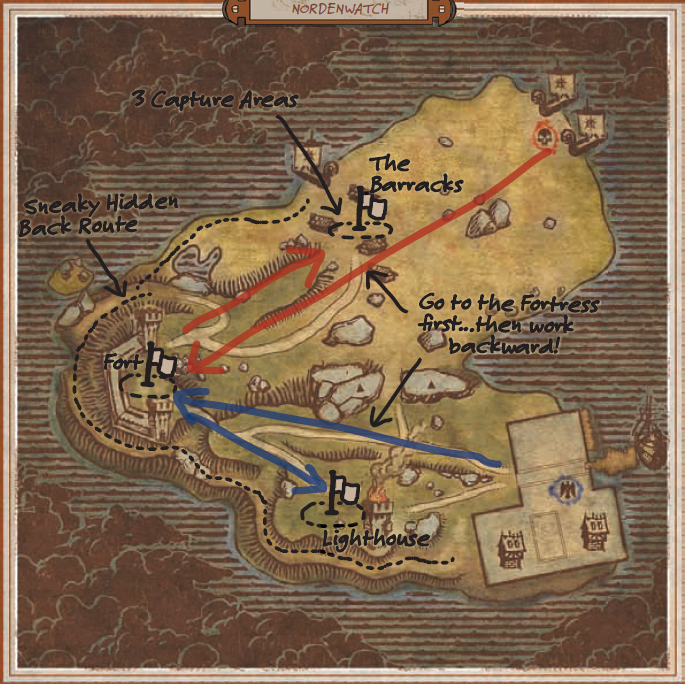
There are three control points: Lighthouse (closest to Order spawn), Fortress (in the middle), and Barracks (closest to Destruction spawn). You need two of the three capture points to win safely. The closest to you and the middle one are the best options. At start mount up and rush to the middle ( Fortress B.O). Leave 1 person to capture the closest B.O OR all stay and capture faster then move as one. Once you have two battle objectives defend them and kill the enemy until you reach 500 points or they surrender.
Best Winning Strategy
You can get an initial point boost by capturing the closest flag (and you should) then do your best to take middle B.O. Controlling both will ensure victory. After gaining control of the middle B.O push to the next and contain the enemy at their War camp. Make sure they don’t slip from the sides to capture back B.O’s. IF you want to fight.. move back to middle and allow them to come out and fight.
Important: If you control the middle B.O and you getting many kills then you don’t need any other B.O. Over extending or splitting up can prove dangerous.
IF you are loosing then try to capture the two side B.O’s and stay away from the enemy (kite). Giving them kills will give them victory, with kill points and middle B.O ticks. Try to force them to move and keep capturing behind them.
Example: pick a fight and kite back to your war camp while someone is or more are capping behind them. Keep them busy and they might not realize that they lost the Flag and you are catching up.
This is not guaranteed to bring you back into the game but it can work. I would say that this Scenario is a brute force one. Some times you have the firepower to win and some time you don’t.

