| Career information | |
|---|---|
| Race | High Elves |
| Role | Melee DPS |
| Armor | Medium |
| Weapons | 2h Axe |
| Special Mechanic | Tamed Lion |
| Mirror Career | Marauder / Squig Herder |
| Gender | Both |
| Abbrevations | WL, Lion |
Archetype: Melee DPS
Special Mechanic: Tamed Lion
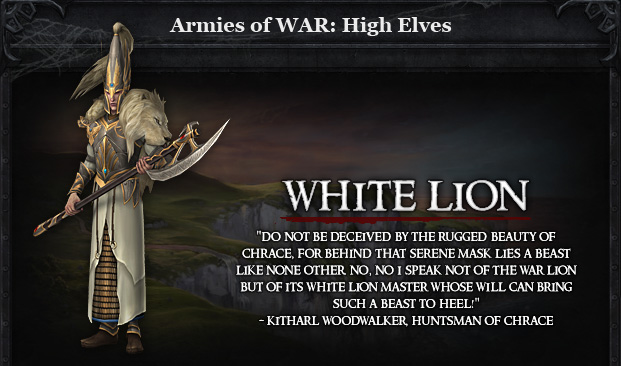
Class Details: An offensive melee attacker, White Lions fight side-by-side with a lion companion that they have captured and tamed. Whether distracting the enemy while the lion mails them, or disposing of them directly with their mighty great axes the White Lions can take down enemies in nearly any situation.
Originating in the northern clans of the High Elves, the White Lion is a hardy fighter who uses defensive and offensive power to bring enemies to their knees. The White Lions live up to their name, fighting with the ferocity of lions, while retaining the grace of the hunter. At the end of martial training, prospective White Lion candidates are sent into the wilds to find and slay an actual white lion. When they do so, the pelt of that lion is skinned and used as the main decoration for the White Lion. If the prospective White Lion fails, he is killed, most often by the lion.
The White Lion class of the High Elves is the tank of the High Elves, making him the one to take the majority of damage in battle. With his survival techniques and strong fortitude, the White Lion is capable of holding his own against any foe.
Career Masteries
Originating in the northern clans of the High Elves, the White Lion is a hardy fighter who uses defensive and offensive power to bring enemies to their knees. The White Lions live up to their name, fighting with the ferocity of lions, while retaining the grace of the hunter. At the end of martial training, prospective White Lion candidates are sent into the wilds to find and slay an actual white lion. When they do so, the pelt of that lion is skinned and used as the main decoration for the White Lion. If the prospective White Lion fails, he is killed, most often by the lion.
The White Lion class of the High Elves is the tank of the High Elves, making him the one to take the majority of damage in battle. With his survival techniques and strong fortitude, the White Lion is capable of holding his own against any foe.
Path of the Hunter
White Lions who choose the path of the Hunter embrace the ways of the wild and fight shoulder to shoulder with their War Lion. The two stride into battle side by side in a balanced assault that is capable of spreading damage around to multiple targets with ease. This path requires the least amount of Master & Pet coordination so damage against a single
foe is lessened.
Path of the Axeman
White Lions who choose this path focus on the Mastery of their fine woodsman axes, preferring instead to use their lions as distractions as they approach from the side or Rear. The path of the Axeman requires good coordination with your War Lion or your group members so you can be allowed to strike from an unguarded flank.
Path of the Guardian
White Lions who choose this path focus on diverting attention from their War Lion or Group members so that they can do maximum damage. The path of the guardian does not directly increase the White Lion’s own defenses significantly but focuses more on reducing his opponents damage output.
Important Stats
As an White Lion you will need the following statistics which you can improve using armor sets, weapons, rings, talismans and renown points.
Strength Skill: Increases your melee damage and reduces your opponent’s chance to block or parry.
Weapons Skill: Increases your armor penetration and parry.
Critical Chance: Increases your chance to deal critical damage ( not the amount).
Wounds: Increases your overall HP. You can never have enough HP.
Acquiring Gear
There are many ways to get gear:
- Open RvR: The gear and weapons you get here are for your main spec. When you kill or lock a zone you will be given a number of War Crests according to your level which you can trade for armor and weapons. At the end of a zone if you roll high enough you will be give a color bag with may contain certain tokens that you can trade and get a jewel set. Engineers don’t have defensive jewels set like other classes.
- Scenarios: Scenarios remain a very strong source of gear. You continue to earn War Crests at the end of every scenario, which are then traded with vendors in Altdorf (Order) or the Inevitable City (Destruction) for armor and weapons. The quality of gear from scenarios can still be among the best in the game, making them a crucial part of gearing up.
- Achievements & Tokens: The Tome of Knowledge is still a vital system. By completing achievements (e.g., killing a certain number of creatures, collecting specific items, or exploring areas), you unlock entries in your Tome. These unlocks can reward tokens that are then traded in the library in Altdorf or the Inevitable City for unique jewels or tactics. Some very desirable sets and bonuses can be acquired this way. The development team has continued to add more Tome Achievement Unlocks, including some tied to Live Events as of 2025.
- Tier 4 epic quests: The epic quest lines in each area continue to be a source of significant rewards. Upon completing these lengthy, multi-step quest chains, you are typically given a choice of a powerful item, often with unique appearances or stats. These quests are a reliable way to get high-quality gear.
- Dungeons & Lairs: Dungeons and lairs are still important for acquiring gear, weapons, and jewels, both while leveling up and for end-game progression. The RoR team has been actively updating and even adding new PvE content. For example, as of early 2025, there’s a “Lost Vale” dungeon update introducing new armor sets (Dark Promise sets, including main spec, off-spec, and hybrid options), and materials for crafting permanent rings.
- Ward System: The game utilizes a “Ward” system where you often need to unlock lower-tier Ward sets before being able to equip higher-tier dungeon gear (e.g., Gunbad -> City -> Bastion Stair).
- Public Quests (PQs): While not strictly “dungeons,” PQs are large-scale PvE events that can also provide gear through loot bags. RoR has implemented different difficulties for PQs (Easy, Normal, Hard) which scale with the recommended number of players and offer varying loot quality.
The White Lion: High Elf Hunter of the Battlefield
The White Lion in Warhammer Online: Return of Reckoning is a dynamic and highly mobile melee DPS class that fights side-by-side with its formidable lion companion. These offensive attackers are masters of the hunt, utilizing a unique blend of personal great axe combat and coordinated pet assaults to control and dispatch enemies across the diverse landscapes of Realm vs. Realm (RVR).
RVR Strengths: The Apex Predator and its Companion
- Two-Pronged Offensive (White Lion & Pet): The core strength of the White Lion lies in the seamless synergy with its lion companion. Whether the lion is distracting the enemy while the White Lion unleashes devastating great axe attacks, or the White Lion is directly engaging while its pet adds significant damage and control, this dual threat makes them highly effective. The combined damage output is decent to great after recent patches (2020), allowing them to take down enemies in nearly any situation.
- Exceptional Mobility and Target Adhesion: The White Lion is a remarkably mobile and agile class, making it incredibly difficult for enemies to escape their clutches. Their “hunting skills” are specifically designed for target acquisition and lockdown in RVR:
- Pounce: A vital gap-closer that allows the White Lion to quickly initiate combat or pursue fleeing enemies.
- Fetch (Pet Ability): This unique skill enables the White Lion to send their pet into combat to pull an enemy to them, isolating high-value targets or preventing enemies from escaping. This is an extremely powerful tool for controlling the battlefield.
- The combination of these abilities means getting away from a White Lion is very difficult, making them relentless pursuers of enemy backlines.
- Versatile Damage and Control: While primarily focused on single-target damage, the White Lion also possesses some AoE abilities. This versatility allows them to contribute to both focused target elimination and to cleave through grouped enemies when necessary. Their robust toolkit of offensive and control abilities makes them a constant threat.
- Ubiquitous RVR Presence: The White Lion can effectively play in all aspects of RVR:
- Solo Roaming: Their mobility, self-sustain (often through pet mechanics or specific talents), and the ability to handle 1v1 engagements make them strong contenders for solo RVR, capable of picking off stragglers or contesting objectives.
- Small Groups (6-Man Parties, Scenarios, Ranked Scenarios): They provide crucial single-target burst, highly effective enemy isolation (via Fetch), and relentless pressure, allowing their group to quickly eliminate key targets.
- Warbands (24-Man Groups): In larger engagements, White Lions act as agile flankers or shock troops, capable of quickly diving the enemy back line to harass healers or ranged DPS, isolating targets for the main warband’s focus fire, and contributing consistent damage to the melee train.
RVR Challenges: Pet Management
- Pet Vulnerability: While the lion is a powerful asset, it is also a distinct target. A White Lion’s effectiveness can be significantly reduced if their pet is quickly focused down and killed by the enemy. Effective pet management, including proper positioning, defensive commands, and potentially healing the pet, is crucial for sustained RVR impact.
- Reliance on Pet Synergy: Many of the White Lion’s most impactful RVR plays, such as Fetch, are reliant on their pet. If the pet is on cooldown, out of position, or dead, the White Lion loses a significant portion of its utility and damage.
The White Lion in RVR: A Hunter Unleashed
The White Lion is a dynamic and highly effective melee DPS in Warhammer Online: Return of Reckoning, defining the role of a mobile, high-impact hunter. Their unique synergy with their lion companion, combined with exceptional mobility and powerful control abilities, allows them to dictate engagements, isolate key targets, and deliver consistent damage across all RVR scenarios. For players who enjoy agile, pet-assisted combat and the thrill of the chase, the White Lion offers a uniquely engaging and impactful RVR experience.
Playing a Damage Per Second (DPS) class in Warhammer Online: Return of Reckoning (RoR) is all about maximizing your offensive output, assisting your tank, and eliminating enemy threats efficiently. While tanks soak damage and healers keep everyone alive, DPS are the sharp end of the spear, responsible for taking down the enemy.
Just like with tanks, the specific skill names and mechanics will vary slightly between DPS careers (e.g., White Lion, Slayer, Witch Hunter, Shadow Warrior for Order; Choppa, Marauder, Sorcerer, Squig Herder for Destruction), but the core principles of effective DPS remain consistent.
The Core Philosophy of a RoR DPS
A successful RoR DPS focuses on:
- Target Prioritization: Knowing who to hit and when to hit them.
- Damage Maximization: Utilizing your rotations, procs, and cooldowns effectively to output the highest possible damage.
- Situational Awareness: Avoiding unnecessary damage, positioning for optimal attacks, and reacting to battlefield changes.
- Assisting Allies: Peeling for healers, interrupting key enemy abilities, and adding utility where needed.
Essential DPS Skills and Their Usage
1. Core Damage Abilities (Spam/Rotation Skills)
- What they do: These are your bread-and-butter attacks, forming the core of your damage rotation. They generate resources (if applicable) or simply deal consistent damage.
- When they’re used:
- On Cooldown (or as part of your rotation): Most DPS careers have a specific sequence of abilities that maximize their damage output. Learn this rotation and execute it consistently.
- Resource Management: If your class uses a resource (e.g., Meticulous Strike for Witch Hunters generating ‘Accuracy’), ensure you’re using your skills in a way that keeps your resource high enough to use your more powerful abilities.
- Example: As a Choppa, your core rotation might involve alternating between “Furious Choppa” (damage + rage generation) and “Rampage” (damage + rage consumption), trying to keep your “Reckless Abandon” buff up as much as possible. You’re constantly hitting these abilities as soon as they’re available, focusing on your primary target.
2. Burst / Cooldown Abilities
- What they do: These are your most powerful damage-dealing abilities, often with long cooldowns. They are designed to deliver a massive spike of damage in a short window.
- When they’re used:
- Opening Engagements: Often used at the very start of a fight, especially in coordinated assaults, to quickly eliminate a priority target.
- Execute Phase: When an enemy’s health drops low, burst abilities can quickly finish them off before they can be healed or escape.
- Responding to Healing: If an enemy is being heavily healed, a coordinated burst from multiple DPS can overwhelm the healing.
- Focus Fire: Used in conjunction with other DPS to quickly eliminate a pre-called target.
- Example: As a Sorcerer, you might open with “Daemonic Breath” or “Gaze of the Dark Gods” to apply a powerful debuff or initial burst, followed by your core rotation. When your group calls for a focus fire on an enemy healer, you pop your “Gifts of Chaos” to significantly amplify your damage for a short duration and unleash your most powerful spells.
3. Interrupts (Punt, Stagger, Silence)
- What they do: These abilities stop an enemy’s current cast, preventing them from using a spell or channeled ability.
- When they’re used:
- Critical Casts: Identify and interrupt high-impact enemy abilities. This includes:
- Heals: Stopping enemy healers from saving their allies.
- CC: Preventing enemy mages from polymorphing your tank or putting your healer to sleep.
- Big DPS Spells: Interrupting powerful AoE nukes or single-target burst spells.
- Denying Resources: Some abilities are crucial for resource generation. Interrupting them can starve an enemy.
- Setting up Kills: Interrupting an enemy’s escape ability can ensure they stay in range for your group to finish them.
- Critical Casts: Identify and interrupt high-impact enemy abilities. This includes:
- Example: You see an enemy Archmage beginning to cast “Healing Resonance,” a powerful AoE heal. You immediately use your “Rift Blade” (Shadow Warrior) or “Gut Ripper” (Witch Hunter) to interrupt the cast, denying their group a significant amount of healing.
4. Crowd Control (CC) – Roots, Snares, Stuns, Disarms, Blinds
- What they do: These abilities impair enemy movement, actions, or vision, making them vulnerable or preventing them from attacking.
- When they’re used:
- Peeling for Allies: If an enemy melee DPS is on your healer, a root or snare can create distance, allowing your healer to escape or for your tank to re-engage.
- Target Isolation: Rooting a specific enemy can prevent them from fleeing or reaching their allies for healing.
- Setting Up Kills: Stuns can hold an enemy in place for your group to burst them down without retaliation. Disarms prevent melee attackers from using their weapons.
- Kiting: Applying snares to keep dangerous melee enemies at a distance while you deal damage.
- Example: An enemy Witch Elf has bypassed your tank and is now tearing into your Bright Wizard. You quickly apply a “Winged Death” (Witch Hunter) to root the Witch Elf, allowing your Bright Wizard to create distance and for your tank to pick them up.
5. Debuffs (Offensive Utility)
- What they do: DPS classes often have abilities that reduce enemy armor, resistances, outgoing damage, or healing received.
- When they’re used:
- Focus Fire Enhancement: Apply armor or resistance debuffs to the enemy target your group is focusing. This significantly increases the damage all your allies deal to that target.
- Threat Reduction: Debuffs that reduce enemy damage output can ease the burden on your healers, especially from dangerous melee DPS.
- Anti-Heal: Apply anti-healing debuffs to enemy healers or high-priority targets to reduce the effectiveness of incoming healing.
- Example: Your warband is focusing an enemy Ironbreaker. As a Squig Herder, you consistently apply “Barbed Arrow” to him, reducing his armor and making him much easier for your entire group to burn down.
General DPS Principles
- Target Priority:
- Healers First (often): Eliminating enemy healers is usually the quickest way to win a fight.
- Squishy DPS: Mages, archers, and some melee DPS are often easier to kill than tanks and can deal significant damage if left unchecked.
- Debuffers/CCers: Sometimes, taking out an enemy who is consistently applying powerful debuffs or CC to your team is a higher priority.
- Tanks Last: Tanks are designed to be hard to kill. Only focus them if all higher priority targets are dead or they are isolated and vulnerable.
- Positioning:
- Melee DPS: Stay on the enemy’s flanks or back to avoid cleaves and maximize your damage (some classes get bonuses for this). Stick to your tank’s target or peel for your healers.
- Ranged DPS: Maintain maximum range from the enemy frontline while still having line of sight to your target. Stay near your healers for potential peels or heals. Avoid being isolated.
- Situational Awareness:
- Watch for Enemy CC: Be ready to break free from roots, snares, or stuns, or to anticipate them and use a defensive ability.
- Avoid AoE: Don’t stand in enemy AoE spells. Even as a DPS, taking unnecessary damage taxes your healers.
- Protect Yourself: Don’t rely solely on your healers. Use your personal defensive abilities (e.g., “Dodge” for Witch Hunters, “Thousand Cuts” for Slayers) when you’re taking heavy damage.
- Communication: Call out your targets, especially if you’re initiating on a healer. Let your group know if you’re getting focused or if you’re out of position.
- Renown Skills: Prioritize offensive renown skills like Weapon Skill/Ballistic Skill, Initiative, and Strength/Intelligence. Defensive renown can be useful too, but your primary role is damage.
- Potions: Keep damage potions and speed potions on hand to enhance your burst or escape sticky situations.
By mastering these elements, a DPS player in RoR becomes a crucial force, turning the tide of battle through decisive damage and intelligent utility.
