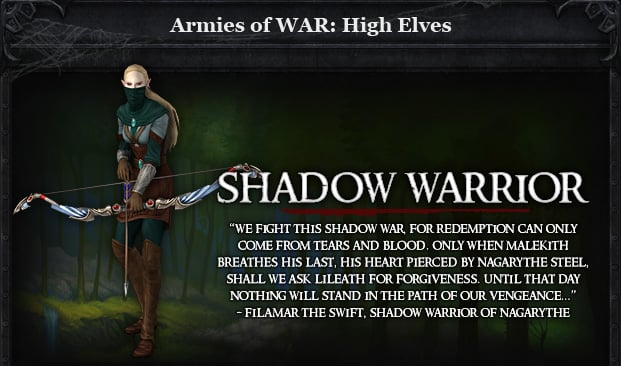
| Career information | |
|---|---|
| Race | High Elves |
| Role | Ranged DPS |
| Armor | Light |
| Weapons | 1H Sword, Bow |
| Special Mechanic | Strategic Manouvers |
| Mirror Career | Squig Herder / Marauder |
| Gender | Both |
| Abbrevations | SW |
Archetype: Ranged DPS
Special Mechanic: Strategic Maneuvers
Class Details: A flexible offensive attacker at any range, Shadow Warriors are skilled at both bow and blade. They pick strategies to best suit the battlefield, and can easily shift from being deadly long-range attacker to a highly mobile medium-range skirmisher. In hand to hand combat, Shadow Warriors are also lethal and can dispose of enemies swiftly with their blades.
The oldest class in High Elf history, the Shadow Warrior came to be while the High Elves were warring with one another and with outside invaders at the beginnings of time. They strike from the shadows using bows and daggers to inflict killing blows before they are ever seen. Shadow warriors use a hit-and-run technique, flanking their enemies and killing them quickly, often without ever being detected. Though Shadow Warriors lack the civility that other classes of the High Elves boast, they do contain a certain measure of grace that few other elves can attain.
The Shadow Warrior is another ranged damage for the high elves. He is also capable of striking from the shadows quickly and quietly without remorse.
Career Masteries
The oldest class in High Elf history, the Shadow Warrior came to be while the High Elves were warring with one another and with outside invaders at the beginnings of time. They strike from the shadows using bows and daggers to inflict killing blows before they are ever seen. Shadow warriors use a hit-and-run technique, flanking their enemies and killing them quickly, often without ever being detected. Though Shadow Warriors lack the civility that other classes of the High Elves boast, they do contain a certain measure of grace that few other elves can attain.
The Shadow Warrior is another ranged damage for the high elves. He is also capable of striking from the shadows quickly and quietly without remorse.
Path of the Scout
The Path Of The Scout focuses on delivering devastating attacks from a great distance. A Master of this path will prepare patiently and then strike swiftly, unleashing a deadly hail of arrows with grim results. A Shadow Warrior specializing in this strategy will prefer to stand his ground as far as from his enemies as he can, and force them to come to him.
Path of Assault
The Path Of Assault teaches Shadow Warriors to augment their bow attacks with blades as well. Someone who adopts this strategy will prefer to first cripple their target with bow fire, and will then bring the fight to the enemy instead of remaining back at a distance. While even a specialist in this path will still place their trust in their longbow, they will be able to easily throw an enemy off-balance by charging in to the fight instead of trying to stay back at a distance.
Path of the Skirmisher
The Path Of The Skirmisher is a strategy for close-quarters combat. Focused on short-distance bow attacks, someone who specializes in this path will still remain mobile while drawing their shots. These nimble attacks grant deadly flexibility to the Shadow Warrior – while he must get much closer to his enemies, he does not have to remain stationary, and is able to draw his targets out into bloody ambushes.
Important Stats
As an Shadow Warrior you will need the following statistics which you can improve using armor sets, weapons, rings, talismans and renown points.
Ballistics: Increase your damage with all skills and reduce the chance to be dodged.
Weapons Skill: Increases your armor penetration and parry.
Critical Chance: Increases your chance to deal critical damage ( not the amount).
Wounds: Increases your overall HP. You can never have enough HP.
Acquiring Gear
There are many ways to get gear:
- Open RvR: The gear and weapons you get here are for your main spec. When you kill or lock a zone you will be given a number of War Crests according to your level which you can trade for armor and weapons. At the end of a zone if you roll high enough you will be give a color bag with may contain certain tokens that you can trade and get a jewel set. Engineers don’t have defensive jewels set like other classes.
- Scenarios: Scenarios remain a very strong source of gear. You continue to earn War Crests at the end of every scenario, which are then traded with vendors in Altdorf (Order) or the Inevitable City (Destruction) for armor and weapons. The quality of gear from scenarios can still be among the best in the game, making them a crucial part of gearing up.
- Achievements & Tokens: The Tome of Knowledge is still a vital system. By completing achievements (e.g., killing a certain number of creatures, collecting specific items, or exploring areas), you unlock entries in your Tome. These unlocks can reward tokens that are then traded in the library in Altdorf or the Inevitable City for unique jewels or tactics. Some very desirable sets and bonuses can be acquired this way. The development team has continued to add more Tome Achievement Unlocks, including some tied to Live Events as of 2025.
- Tier 4 epic quests: The epic quest lines in each area continue to be a source of significant rewards. Upon completing these lengthy, multi-step quest chains, you are typically given a choice of a powerful item, often with unique appearances or stats. These quests are a reliable way to get high-quality gear.
- Dungeons & Lairs: Dungeons and lairs are still important for acquiring gear, weapons, and jewels, both while leveling up and for end-game progression. The RoR team has been actively updating and even adding new PvE content. For example, as of early 2025, there’s a “Lost Vale” dungeon update introducing new armor sets (Dark Promise sets, including main spec, off-spec, and hybrid options), and materials for crafting permanent rings.
- Ward System: The game utilizes a “Ward” system where you often need to unlock lower-tier Ward sets before being able to equip higher-tier dungeon gear (e.g., Gunbad -> City -> Bastion Stair).
- Public Quests (PQs): While not strictly “dungeons,” PQs are large-scale PvE events that can also provide gear through loot bags. RoR has implemented different difficulties for PQs (Easy, Normal, Hard) which scale with the recommended number of players and offer varying loot quality.
The Shadow Warrior: High Elf Master of Flexible Warfare
The Shadow Warrior in Warhammer Online: Return of Reckoning is a highly adaptable and lethal ranged DPS class, distinguished by its mastery of both bow and blade. This flexibility allows them to operate as a versatile offensive attacker at any range, seamlessly shifting between being a deadly long-range sniper, a highly mobile medium-range skirmisher, or even a lethal hand-to-hand combatant. This unparalleled adaptability makes them a valuable and unpredictable force in Realm vs. Realm (RVR) combat.
RVR Strengths: The Tactical Chameleon
- Unrivaled Adaptability (Three Specializations): The Shadow Warrior’s greatest strength lies in its three distinct yet interconnected specializations, allowing them to precisely tailor their role to the demands of any RVR situation:
- Long-Range Single-Target (Bow) Spec: Excels at precision damage from a distance. This spec is ideal for defending keeps and forts, where the Shadow Warrior can sit on high, protected positions, acting as a sniper to pick off specific high-value targets like enemy healers, ranged DPS, or siege engines.
- Melee Single-Target (Blade) Spec: Transforms the Shadow Warrior into a potent close-quarters combatant. This spec is good at disposing of enemies of all types, particularly effective against other ranged classes and casters who typically struggle in sustained melee. The ability to shift into melee makes them a dangerous duelist and a significant threat to enemy backlines.
- Ranged AoE (Skirmish/AoE Bow) Spec: Focuses on dealing Area-of-Effect damage at medium range. This spec is highly effective for keep/fort defenses (barraging chokepoints) and is the primary reason why Shadow Warriors secure 1-2 spots in warband play, where their consistent AoE damage contributes significantly to breaking enemy formations and clearing objectives.
- Seamless Stance Dancing: The core of the Shadow Warrior’s identity is their ability to easily shift between these ranged and melee modes. This “stance dancing” allows them to adapt on the fly, for instance, starting an engagement at long range, then swiftly closing the distance to finish off a weakened foe in melee, or disengaging from a melee threat to resume ranged attacks. This fluidity makes them a challenging opponent to pin down and counter.
- Versatile RVR Applicability: The Shadow Warrior is effective in almost every RVR scenario:
- Solo and Group RVR: Their inherent flexibility makes them good as solo and in groups for general RVR (PVP). A solo Shadow Warrior can pick engagements carefully, exploiting their range or melee prowess as needed.
- Smaller Group Fights: All three builds can be fine-tuned with the right modifications to excel in smaller group fights (duos, 6-mans, scenarios), offering tailored damage and utility depending on the group’s needs.
RVR Challenges: Resource Management and Positioning
- AP Management for Stance Switching: While fluid, frequent stance switching and ability usage require careful management of Action Points, as running out can leave a Shadow Warrior vulnerable or unable to execute their desired combat rotation.
- Optimal Range Management: To maximize effectiveness, a Shadow Warrior must constantly evaluate the optimal range for their current specialization and the combat situation. Mispositioning can lead to reduced damage or increased vulnerability, especially for the ranged specs.
- Fragility in Melee (Ranged Specs): While the melee spec is lethal, the ranged specializations, like other pure DPS classes, remain relatively soft targets. Engaging in melee without the proper build or support can be risky for these specs.
The Shadow Warrior in RVR: The Flexible Blade and Bow
The Shadow Warrior in Warhammer Online: Return of Reckoning is the embodiment of flexible offensive power. Their unique ability to transition seamlessly between long-range precision, medium-range AoE, and deadly melee combat makes them a truly unpredictable and valuable asset. Whether sniping from a distance, cleaving through a warband, or dueling an isolated foe, the Shadow Warrior offers a dynamic and rewarding RVR experience for those who master the art of the multi-faceted warrior.
Playing a Damage Per Second (DPS) class in Warhammer Online: Return of Reckoning (RoR) is all about maximizing your offensive output, assisting your tank, and eliminating enemy threats efficiently. While tanks soak damage and healers keep everyone alive, DPS are the sharp end of the spear, responsible for taking down the enemy.
Just like with tanks, the specific skill names and mechanics will vary slightly between DPS careers (e.g., White Lion, Slayer, Witch Hunter, Shadow Warrior for Order; Choppa, Marauder, Sorcerer, Squig Herder for Destruction), but the core principles of effective DPS remain consistent.
The Core Philosophy of a RoR DPS
A successful RoR DPS focuses on:
- Target Prioritization: Knowing who to hit and when to hit them.
- Damage Maximization: Utilizing your rotations, procs, and cooldowns effectively to output the highest possible damage.
- Situational Awareness: Avoiding unnecessary damage, positioning for optimal attacks, and reacting to battlefield changes.
- Assisting Allies: Peeling for healers, interrupting key enemy abilities, and adding utility where needed.
Essential DPS Skills and Their Usage
1. Core Damage Abilities (Spam/Rotation Skills)
- What they do: These are your bread-and-butter attacks, forming the core of your damage rotation. They generate resources (if applicable) or simply deal consistent damage.
- When they’re used:
- On Cooldown (or as part of your rotation): Most DPS careers have a specific sequence of abilities that maximize their damage output. Learn this rotation and execute it consistently.
- Resource Management: If your class uses a resource (e.g., Meticulous Strike for Witch Hunters generating ‘Accuracy’), ensure you’re using your skills in a way that keeps your resource high enough to use your more powerful abilities.
- Example: As a Choppa, your core rotation might involve alternating between “Furious Choppa” (damage + rage generation) and “Rampage” (damage + rage consumption), trying to keep your “Reckless Abandon” buff up as much as possible. You’re constantly hitting these abilities as soon as they’re available, focusing on your primary target.
2. Burst / Cooldown Abilities
- What they do: These are your most powerful damage-dealing abilities, often with long cooldowns. They are designed to deliver a massive spike of damage in a short window.
- When they’re used:
- Opening Engagements: Often used at the very start of a fight, especially in coordinated assaults, to quickly eliminate a priority target.
- Execute Phase: When an enemy’s health drops low, burst abilities can quickly finish them off before they can be healed or escape.
- Responding to Healing: If an enemy is being heavily healed, a coordinated burst from multiple DPS can overwhelm the healing.
- Focus Fire: Used in conjunction with other DPS to quickly eliminate a pre-called target.
- Example: As a Sorcerer, you might open with “Daemonic Breath” or “Gaze of the Dark Gods” to apply a powerful debuff or initial burst, followed by your core rotation. When your group calls for a focus fire on an enemy healer, you pop your “Gifts of Chaos” to significantly amplify your damage for a short duration and unleash your most powerful spells.
3. Interrupts (Punt, Stagger, Silence)
- What they do: These abilities stop an enemy’s current cast, preventing them from using a spell or channeled ability.
- When they’re used:
- Critical Casts: Identify and interrupt high-impact enemy abilities. This includes:
- Heals: Stopping enemy healers from saving their allies.
- CC: Preventing enemy mages from polymorphing your tank or putting your healer to sleep.
- Big DPS Spells: Interrupting powerful AoE nukes or single-target burst spells.
- Denying Resources: Some abilities are crucial for resource generation. Interrupting them can starve an enemy.
- Setting up Kills: Interrupting an enemy’s escape ability can ensure they stay in range for your group to finish them.
- Critical Casts: Identify and interrupt high-impact enemy abilities. This includes:
- Example: You see an enemy Archmage beginning to cast “Healing Resonance,” a powerful AoE heal. You immediately use your “Rift Blade” (Shadow Warrior) or “Gut Ripper” (Witch Hunter) to interrupt the cast, denying their group a significant amount of healing.
4. Crowd Control (CC) – Roots, Snares, Stuns, Disarms, Blinds
- What they do: These abilities impair enemy movement, actions, or vision, making them vulnerable or preventing them from attacking.
- When they’re used:
- Peeling for Allies: If an enemy melee DPS is on your healer, a root or snare can create distance, allowing your healer to escape or for your tank to re-engage.
- Target Isolation: Rooting a specific enemy can prevent them from fleeing or reaching their allies for healing.
- Setting Up Kills: Stuns can hold an enemy in place for your group to burst them down without retaliation. Disarms prevent melee attackers from using their weapons.
- Kiting: Applying snares to keep dangerous melee enemies at a distance while you deal damage.
- Example: An enemy Witch Elf has bypassed your tank and is now tearing into your Bright Wizard. You quickly apply a “Winged Death” (Witch Hunter) to root the Witch Elf, allowing your Bright Wizard to create distance and for your tank to pick them up.
5. Debuffs (Offensive Utility)
- What they do: DPS classes often have abilities that reduce enemy armor, resistances, outgoing damage, or healing received.
- When they’re used:
- Focus Fire Enhancement: Apply armor or resistance debuffs to the enemy target your group is focusing. This significantly increases the damage all your allies deal to that target.
- Threat Reduction: Debuffs that reduce enemy damage output can ease the burden on your healers, especially from dangerous melee DPS.
- Anti-Heal: Apply anti-healing debuffs to enemy healers or high-priority targets to reduce the effectiveness of incoming healing.
- Example: Your warband is focusing an enemy Ironbreaker. As a Squig Herder, you consistently apply “Barbed Arrow” to him, reducing his armor and making him much easier for your entire group to burn down.
General DPS Principles
- Target Priority:
- Healers First (often): Eliminating enemy healers is usually the quickest way to win a fight.
- Squishy DPS: Mages, archers, and some melee DPS are often easier to kill than tanks and can deal significant damage if left unchecked.
- Debuffers/CCers: Sometimes, taking out an enemy who is consistently applying powerful debuffs or CC to your team is a higher priority.
- Tanks Last: Tanks are designed to be hard to kill. Only focus them if all higher priority targets are dead or they are isolated and vulnerable.
- Positioning:
- Melee DPS: Stay on the enemy’s flanks or back to avoid cleaves and maximize your damage (some classes get bonuses for this). Stick to your tank’s target or peel for your healers.
- Ranged DPS: Maintain maximum range from the enemy frontline while still having line of sight to your target. Stay near your healers for potential peels or heals. Avoid being isolated.
- Situational Awareness:
- Watch for Enemy CC: Be ready to break free from roots, snares, or stuns, or to anticipate them and use a defensive ability.
- Avoid AoE: Don’t stand in enemy AoE spells. Even as a DPS, taking unnecessary damage taxes your healers.
- Protect Yourself: Don’t rely solely on your healers. Use your personal defensive abilities (e.g., “Dodge” for Witch Hunters, “Thousand Cuts” for Slayers) when you’re taking heavy damage.
- Communication: Call out your targets, especially if you’re initiating on a healer. Let your group know if you’re getting focused or if you’re out of position.
- Renown Skills: Prioritize offensive renown skills like Weapon Skill/Ballistic Skill, Initiative, and Strength/Intelligence. Defensive renown can be useful too, but your primary role is damage.
- Potions: Keep damage potions and speed potions on hand to enhance your burst or escape sticky situations.
By mastering these elements, a DPS player in RoR becomes a crucial force, turning the tide of battle through decisive damage and intelligent utility.
