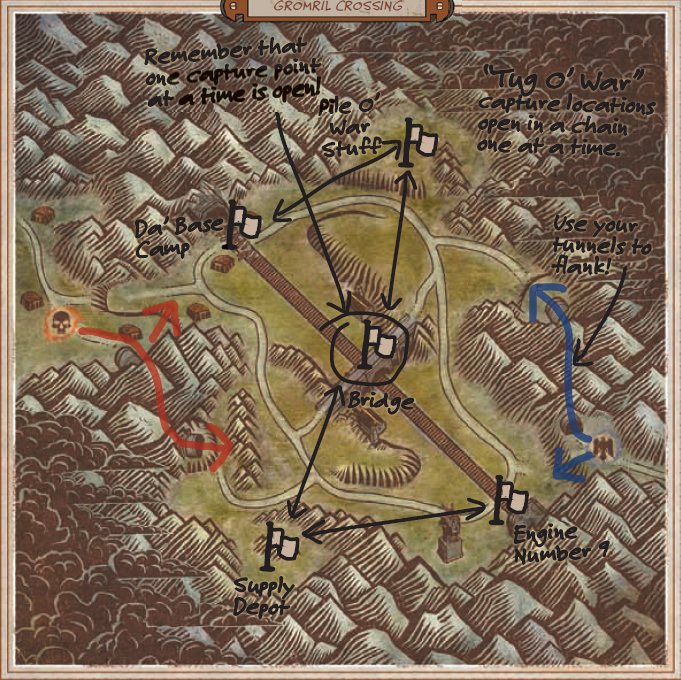
Scoring: 5 points per player kill, 50 points for capturing points in enemy territory, 40 points for recapturing points in your territory, 1 point every 2 seconds while Order holds Da Camp, 1 point every 2 seconds while Destruction holds Engine Number 9.
Scenario Type: Tug of War
Size: 18 Vs 18
Time Limit: 15 minutes
Victory Conditions: 500 points
Overview
The Gromril Spike is the name of the Dwarf train that runs through Kadrin Valley en route to the Empire. Greenskin ambushes along most of the major roads have made travel by cart more dangerous than usual, making the train one of the few reliable transportation methods still available. Unfortunately, the greenskins have noticed the train regularly steaming through Kadrin Valley, and while they may fall short of actually understanding the true purpose of the massive locomotive, they do know that stopping it will anger the Dwarfs. That reason alone is more than good enough to explain why the greenskins have begun attacking the train. To that end, the greenskins have set up several obstacles along the train’s tracks, and they hope to slow the progress of the train enough that reinforcements arrive to help them capture the locomotive. The Dwarfs must defeat or bypass these obstacles before the greenskins can summon enough of their brethren to prevent the train from getting through at all.
Intended Mechanics
- A back and forward flag race (Capture and move forward. Delay and be set back)
- Capture Objective and move, with a tactical re capture to create flow in the game play.
Order & Destruction Strategy
This is a traditional “Tug of War” battle. Both sides own two flags at the start, with the neutral Bridge flag in the middle. If you can take control of the Bridge, one of your enemy’s flags becomes available, and if you take that, the flag farthest away, becomes your target. Capture that and you earn big points, plus steady points over time.
You have two exits from the spawn point: directly down into the fray, which takes you below the elevated Bridge flag, or through the tunnel, which wraps you around in a flanking position and deposits you near the Bridge flag. You definitely want to take the Bridge flag and push forward slowly.
Best Winning Strategy
Move through the tunnel area to get to the bridge faster. Do not delay. Thin the enemy numbers on the bridge by punting them off and gain a numeric advantage. Push the enemy backwards and let your healers / range to cap by proximity. After capping keep fighting on the bridge and send 1-2 or more if you feel you can spare them to capture the next objective. When captured then move to re enforce the push. If that’s not possible wait until the enemy capture the next objective and re cap the bridge until you find the right moment to push the next objective.
If you are loosing:
IF you lose the bridge fight but still holding keep at it and let 1-2 to capture your next flag to re open bridge objective. Play this smart. Use those people to flank and punt people off or put pressure to the enemy healers. there will be no tanks or melee there and it could create an opening.
IF you lost the fight completely
- Regroup!
- Keep the enemy busy if you can while some one is capturing the open objective to start your counter push
- IF have lost all flags two options.
-
- Use the tunnel to go out and try to pull the enemy away from the flag with some of your forces and push with the rest from War camp and attack them fro both sides
- Use the cannons in a frontal assault to the first objective
