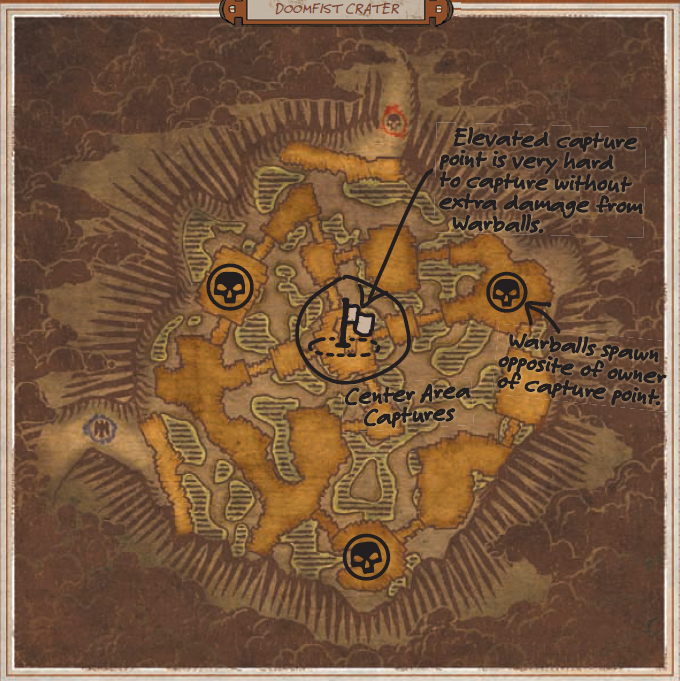
Scenario Type: War Ball
Size: 12 Vs 12
Time Limit: 15 minutes
Victory Conditions: 500 points
Scoring: 3 points every 5 seconds for holding capture area, 2 points per player kill, 1 point per player kill if you hold a War Ball, 1 point if you kill the player carrying the War Ball.
Overview
Doomfist Crater dominates the horizon in the southwest area of the Badlands; it is the ancient site of a pitched battle in which a powerful Chaos champion was slain. The resulting explosion as his body released all the stored up Chaos energy was large enough to level mountains. Deep within the crater, now filled with green, toxic waters, the champion’s remains have rested for thousands of years, his bones infused with tiny bits of warp stone. Over the top of the crater’s epicenter, goblins have constructed floating platforms, connected to the crater’s edge by rickety bridges. From these platforms, the goblins are dredging up bits of warp stone for nefarious purposes. The scenario mixes King of the Hill rules with War Ball. There is one central capture area, and if you can hold it, your team gains the most points over time. However, if your team controls the capture area, War Balls spawn for the other team around the cavern. These War Balls grant the bearer 25 percent more damage. Unfortunately, each player killed with a War Ball results in a 25 percent chance of the bearer dying as well. After one minute, no matter what, the player carrying the War Ball dies.
Intended Mechanics
- Capture the Battle Objective (Flag).
- Hold to Win the Scenario.
- Use Murder Balls to help you in the fight (IF needed).
Order & Destruction Strategy
Proceed to the center of the cavern as an organized unit. The only way to hold the central capture area is with coordinated tactics or raw superior numbers. The capture area is wide open, so attacks can come from any direction. If you’re holding it, face outward, ready for anything, and work in small groups to repel invaders. Healers should stay in the middle and load available targets, specifically ones being targeted, with heal-over-time spells. Utilize the other entrance to flank the enemy or disrupt healers.
Best Winning Strategy
Move as one as fast as you can to the middle Objective and try to secure it. This is a smart fight. To capture the Flag you need more people in the middle to secure it. Tip the numbers to your advantage by punting as many as you can off the platform. Let tanks do their job and watch for punt immunities. If you can and get there early, position the healers on the flag to capture and the rest to funnel the bridge to prevent the enemy getting to the flag and the healers.
If you are struggling (Even fight) or you are losing try to pick up the Warballs to gain an advantage. They deal damage over time but the damage bonus makes them worth it to turn the fight. Allow a high DPS to get the warball to maximize the effects.
Healers:
- Can AoE heal behind the columns in the Flag area to avoid been punted.
- IF punted you can AoE heal under the platform in relative safety. You have the reach. (Take care AoE heals are slow).
- Can also place your back to a column and have single target heal access but you might be punted to the sides.
Tanks:
- Punt Tanks off the platform First to remove guards from the play.
- Guard & Swap as needed!!!!!
- Punt off DPS second to reduce DPS to your team.
DPS:
- Target Healers FIRST!
- DPS second.
- Tanks LAST!
